There’s a 3D printer on the ISS thanks to Made in Space and Mike Chen

Humanity reached a big milestone this year. For millions of years, every tool that homo sapiens has ever made has had one thing in common: it was made on Earth.

The first 3D printer in space from Made in Space

But this year we successfully launched a 3D printer into space, marking the first time in human history that we can make an object off the surface of the earth. The group that has made this possible (besides NASA) is Made in Space, a company founded to prove that off-world additive manufacturing is both possible and the next step in space colonization. I talked with Made in Space co-founder Mike Chen about the future of making in space.

Getting to space is getting easier each year, but even with the new SpaceX Dragon missions, the cost of putting a kilogram of mass on the International Space Station is still about US$22,000. That makes it unreachable for most of us. In 2010 Made in Space saw a chance to disrupt this rocket-powered supply chain and enable manufacturing in space using newly available consumer 3D printer technology. They ran countless tests of existing consumer 3D printers onboard a reduced gravity aircraft (aka the Vomit Comet) to find a suitable design. Mike explained the problem, “We actually get a few emails a week [where] someone takes a printer and turns it upside down or sideways and says, ‘See? This prints upside down, so why wouldn’t this printer work in space?’ You know, you’re just not really thinking it through. Gravity is still there, acting as a force to hold things in place.” Remove that force and everything starts to oscillate. Also, heating elements in microgravity are difficult because there is no natural convection to circulate hot air, making passive cooling nearly impossible. The machine also needs to withstand the violence of launch, which may be the biggest build challenge. The Made in Space team decided that they needed a design of their own.

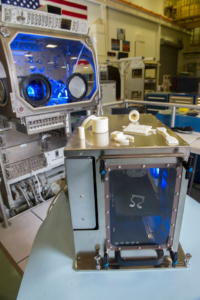
Mike says that’s one of the reasons the space stations exists, to experiment with how different systems act in micro-gravity. This is very much an experiment and is being treated as such. On November 17th, the printer was installed in the Microgravity Science Glovebox (MSG), a facility on the ISS dedicated to possibly harmful experiments, and a perfect place to safely test new technologies. Now that the machine is ready, the first extraterrestrial manufacturing will commence soon.

Zero Gravity 3D printer, image courtesy of Made in Space

I pressed Mike for some details on the machine itself. It’s a Material Extrusion machine like most consumer 3D printers on the market. That means it’s full of steppers; everyone loves steppers. In order to limit their unknown variables, they decided to use ABS plastic as their material. It’s one of the most well known polymers and is a very useful material. ABS does have toxic offgassing, so in addition to being housed in the MSG, there are environmental filters to protect the astronauts’ precious atmosphere. A 3D printing professional will also appreciate these simple design guidelines presented by Future Engineers who host a challenge to inspire schoolkids to design an object to be printed in space. Those guidelines also call out the build volume of 5cm x 10cm x 5cm and specific design hazards posed to an astronaut. Printed parts must not have any support structures or require post processing, which could release small particles in the air that can get in everything, including the astronauts. The standard 45° overhang is present as well. Maybe the next machine will be a 5 axis robot that can follow clever 3D toolpaths and truly print any geometry.

This machine has been designed with multiple design constraints to contend with. These constraints really drove Made in Space to develop their own machine and IP. On the ISS, an hour of an astronaut’s precious time will cost about $50,000. That means no fiddling with extruder tensions or babysitting the machine as it prints. So the printer only has one button, the ON button. Everything else is handled from ground control thanks to the MSG’s video cameras.

The big question is, what will they print first? Made in Space is being very secretive about this, but we won’t have to wait long to find out. The first print will be a special milestone, but subsequent prints will be test coupons that can be compared to prints made in an identical machine on terra firma. After proving the printer’s quality, there is a long list of useful objects that are needed on the ISS. There are hundreds of replacement parts already in storage on the station, but in the future those parts will be made on demand. At that point each kilo of printer material becomes a lot more valuable and versatile. There is even new opportunities to improve the lives of the astronauts by allowing family members to send digital gifts into orbit. In 2009 Randy Bresnik’s daughter was born while he was on an ISS mission. Imagine in addition to a photograph, Randy holding a 3D print of the newest Bresnik while passing out bubblegum cigars to his fellow astronauts.

You too can design something to be produced in space. Mike was keen on energizing the thousands of brand new 3D designers in the world to help solve problems in space. This machine gives an amazing amount of access to the 3D printing community on Earth. Made in Space is very receptive to ideas about what should be manufactured in space. Reach out and find a novel solution to a unique problem and there may even be a commercial benefit in it for you. See what Made in Space is doing on their website and follow Mike Chen on twitter: @MikeChen. These are exciting days.

The Hivelord at UArts Design Charette 2014: Cyborgs

I heard there were smoothies here?

Salutations, flatlanders! Your electron based mail message reached my hyper-dimensional lair, I was lured out of the 67th dimension by word of snacks, refreshments, and of course, your attempts to augment your meaty forms with your so called ‘technology.’ The idea: to design artifacts made 50 years in your future. How will they affect the fragile social human construct? More specifically, are these items you’re designing to simplify and enhance your lives creating one step forward in the inevitable march toward a dystopian hellscape? I’d answer these questions, but I’m technically not allowed to break causality.

But I digress, I’m really here to show you all the souls I stole pictures I took with my face. It only took a few years off your lifespan, and there’s a 50/50 chance they were bad years anyway. Thanks for being such good sports!

Click here -> The Hivelord at UArts Design Charette 2014 <-

Halloween Themed Open Build Night 10/24!

Hackers! Need to finish your costume and/or decorations before the spooky festivities begin? We will be hosting a Halloween themed open build night this Friday, October 24th, 7pm – late o’clock! Suggested themes include wearables, microcontrollers, LEDs, and blood. Bring something to work on!

WHAT: Halloween Open Build Night
WHERE: Hive76 Global Headquarters
WHEN: October 24th, 7pm – ????
WHO: Wizards, witches, warlocks
WHY: ?????

Making the Hivelord [Part 1]

Oh hai

Hello, meatbags! Perhaps you saw me at Maker Faire, jukin and jivin and havin a time. You probably wondered “where did this guy get his slick get-up?” And,  “is it possible for me to build something similar in his glorious image?” And then your dreams were consumed each night by a vivid nightmare of a distant planet, covered in entirely in evergreen trees and a deafening roar. “What is this place, and why am I forced to wander it every night?” No? Well consider yourself one of the lucky ones then.

Anyway, this is part one of the build log for the Hivelord costume. The inspiration was based on the scramblesuit from the novel A Scanner Darkly, by Philip K Dick, which is a suit that anonymizes its user by constantly projecting a changing image of different people on the outside of the suit. I figured that’s not technologically feasible, but making a mask version certainly is. I originally wanted to record short videos of the inside of the mask, with different people wearing it, but as I built the mask it became obvious that it wouldn’t be feasible, or as cool as using it to take photos. There is a raspberry pi running some python code to control the slideshow and picture taking functions along with an arcade button connected to the raspi’s GPIO. Pressing the button puts the screen into preview mode, which shows what the camera is looking at. When the button is released, the picture is taken and added to the slideshow.

Parts list:

  • raspberry pi with camera
  • old laptop screen
  • output converter for the laptop screen
  • arcade style button
  • 12V lead acid battery
  • 5V step down converter (for raspi)
  • HDMI cable
  • military backpack frame
  • copper pipe
  • pipe insulation for padding
  • various nuts and bolts
  • mirror for periscope
  • scrap wood, square dowel
  • orange spandex suit

This first post will focus on creating the screen. I was surprised to find many vendors on ebay selling boards that will convert the proprietary pinout of the laptop board to something useful, such as HDMI or VGA. If you have an old screen laying around, you can even make a new monitor for yourself for $35.

Found an old laptop screen in the hackerspace

Take the case off the screen and read the model number from the back. Look around on ebay for a converter board. It seems like most of them are made to order, so if you don’t find a listing, try contacting a seller. Below is a picture of the board I used, which runs off 12V. Thankfully I found a 12V wall wart in the space to test it.

The deconstructed screen
The screen connector. This will be converted to something useful, like HDMI

The converter board came with all its own cables and its own separate board to control the screen functions, like resolution, alignment, and an on/off button.

Once everything is plugged in, turn it on to test it out. The screen worked perfectly, and automatically configured itself to the correct resolution. There was enough cabling for me to run the wires outside of the original laptop screen case, so I just put everything back the way it was, with the converter board hanging off. All the electronics will eventually be mounted to the wooden frame of the mask.

First try running the screen

Next, connect everything together, screen to converter to raspi, and power it up. Here I am testing out the camera after I changed all the settings to portrait mode.

I then connected it all to a bench supply so I could see how much power the whole set up consumed. It uses just about an amp at 12v. I found a 7 amp-hour 12V lead acid battery on amazon that did a decent job, though I’d probably buy a spare since I did run out of battery at maker faire. There’s a 5V downcoverter thrown in there too, to power the raspberry pi off the 12V supply.

Powering up this mess with a sneak peek of the copper frame.

Thanks for reading! Next post will be on the making of the frame.


Hive76’s Yard Sale Give Away!

The theme of this weeks open house?

Yard sale Giveaway! 
Hive has been accumulating a lot of stuff, and now its time to pass it on to you! 
We have all sorts of stuff!


A blender for blending your things!? A George Foreman Grill for Grilling them?!

A working stereo system could be yours! Do you like printers? We have two of them for you!

Get your Halloween presents NOW!

Pics from the Hivelord at Maker Faire 2014

Yours truly

Hello, mortals! Perhaps you saw me at Maker Faire NY over the weekend; I was the orange dude with the screen head taking your picture with my face. Well not only did your souls add a few thousand years to my already infinitely long lifespan, they got uploaded to the internet, where myself and others can browse them at our leisure from the comfort of our own time traveling spaceships. Have a look yourselves, and I’ll see you all in the past (or in the future, from your puny human perspectives).

Hivelord at Maker Faire NY 2014

Bow before me mortals
A selfie in the hall of mirrors

Hive76 mourns the loss of our friend and president Brendan Schrader

On Wednesday, July 30, our friend and co-founder Brendan Schrader died of a cardiac issue. Brendan had lived with Wolff–Parkinson–White syndrome his whole life with occasional visits to the ER with a racing heart. On Wednesday complications from this syndrome took him from us. He is survived by his loving partner Elana, his mother Mary, and hundreds of family and friends. Details of the funeral service on Tuesday can be found on his obituary page. You can sign and read a guestbook there too with some wonderful sentiments.

Hive76 s a family in many ways, and that made Brendan the dad. He was a driving force in our hackerspace by pushing members to make awesome projects, sharing his knowledge with anyone that visited, and brightening the space with his unconventional sense of humor. In his honor, we will continue to live up to our motto: Make Things Awesome, Make Awesome Things! We hope you will as well.

We love you Brendan, and we miss you.

Brendan Schrader, 31, operations manager of Hive76, a “hacker’s space” in the Spring Garden neighborhood, displays a couple of his “boom cases,” a twist on boom boxes, that he makes in the space, August 15, 2012, in Philadelphia, Pennsylvania. The white case is an old piece of luggage from the 1940s and the one on the right is an old book. (Clem Murray/Philadelphia Inquirer/MCT)

Restored on September 15, 2018 thanks to Archive.org!

Razorbots Class!

We are thrilled to announce our Razorbots class August 10-17! Razorbots are small, simple R/C robots that wield razorblades against one another to pop their opponent’s balloon. They’re good fun even for the most seasoned roboticist and a great entry point for anybody who wants to learn about robotics, electronics, or DIY tech in general. Sign up here! Continue reading “Razorbots Class!”