Computer Aided Design is the way we interact with the digital tools that make things. Do you want to try 3D printing or laser cutting? Ever want to CNC mill something from a chunk of aluminum? The first step is getting your idea into the computer.
Fusion 360 by Autodesk is a powerful parametric CAD tool that is free to use for makers, educators, and even most startups. It rivals SolidWorks in its functionality, but adds features found in many standalone tools. Your instructor Chris Thompson is a certified CAD professional with experience teaching digital making to beginners and professionals alike.
In this class you will learn the basics of most CAD systems and the intricacies of the Fusion 360 interface with hands-on demonstrations. The evening will begin with a general overview of CAD. There will be a structured walk-through of the program where every student creates the same model. This is followed by individual work where students explore the numerous different ways to make any one shape. Do you build up feature-by-feature, or would you rather carve away piece-by-piece? The class will reveal the hidden pitfalls of the program and any caveats. We will cover exporting your files for the next step in making. Any remaining time in the evening will be dedicated to answering any questions you have about CAD or making.
The class is Thursday, June 1 2017 from 7pm – 9pm at Hive76
Tickets are $50 and can be purchased from our ticketleap page. Members, don’t forget your discount!
Students must bring their own laptop with Fusion 360 installed and a 3 button mouse (left, right, scroll wheel button.) Please bring some paper for sketching and notes too.
Students will also need a free Autodesk account to save their work. Please follow these instructions to get set up with a free account.
If you are familiar with 3D printing, you may know of one of the most frustrating constraints in the process: overhangs. For those new to the tech, Material Extrusion machines like the RepRap and Ultimaker extrude molten plastic into air to produce 3D objects. But molten plastic is subject to gravity, so each bit of plastic needs to be supported by a previously printed layer.
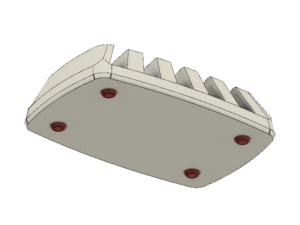
There are a lot of solutions for this constraint. Designing an object not to have overhangs is one approach. Most 3D printers also use one or more materials to print supporting scaffolds for overhanging features. But removing the printed scaffold can sometimes be a mess. Take the example show here of a soap dish:
This model will print really well with the large flat surface placed on the build plate, but the four feet shown in red project below that surface. To print this as is, you would need support structure underneath the entire print with just the feet touching the print bed. Support scaffolding can be a mess, but I have a new method that can avoid support material altogether: flip the print over and print on the nice flat surface. With this approach, the trick is holding the model in place upside down while the feet are printed. The molten plastic will bond to the previously printed part, and the feet will become a permanent part of the soap dish.
3D printed fixtures are already a selling point and common practice in the professional additive manufacturing field, but I haven’t seen any examples of this among the DIYers and consumer 3D printer operators. A 3D printer has the ability to make any tool needed, even single use fixtures for a simple soap dish model. It only takes a bit of CAD to produce a working set of fixtures that will be printed and left installed on the print bed. Take a look at the embedded 3D model below and I will describe the process step-by-step.
CAD your model. I use Fusion 360 because it is quite powerful, and free to use until I start making money.
Create separate bodies for the fixtures and features that will be printed separately. Here the fixtures are in green, and the feet in red. They need to be separate bodies (not joined) so they can be exported separately.
I created the fixtures for this soap dish by starting with a sketch that is in plane with the flat top of the soap dish. Then I extruded that sketch with the option “to object” so it would match the dish’s contour. I also included an offset. See that dialog box here:
It helps that this model, the fixtures, and the feet are all symmetrical. The slicing software Slic3r will automatically center our parts in the printer, a feature we will rely on in this process.
Create the additional features as separate bodies, see as red in the model above.
Export 3 separate STLs: model, fixtures, additions. You can export STLs with multiple shells like the 2 fixtures or 4 feet with this trick.
Slice and print your main model as normal.
Slice the fixtures STL, but use the Brim setting to ensure really good bed adhesion.
Edit the fixtures Gcode to remove your end.gcode and anything else that might turn off a heated build plate. Our fixtures need to stay stuck to the 3D printer. My first attempt failed because the print bed cooled down and the fixtures popped right off.
Slice the additional features STL.
Edit the additional fixtures Gcode to remove any start.gcode including homing commands.
Add G92 Z0 to the top of this additional features Gcode. G92 will set the printer position to Z0.
These two Gcode files will printed back to back with your intervention in the middle. Pay attention to the time.
Print the fixtures Gcode. When it ends, place your model into the fixture. If it doesn’t have a snug fit, tweak the CAD to find the right geometry to hold your model. It doesn’t need to be clamped in, just secure enough that the nozzle won’t move your model.
Now manually move the nozzle so that the tip is right at the flat “underside” of the model. Also home X and Y in case they shifted.
Print the additional features Gcode. Keep a finger on the power or reset button. My second attempt to print this failed because I forgot the G92 Z0 and smushed the nozzle into my print.
If all goes according to plan, the printer will add your additional features directly to your existing model.
Check out a timelapse of my third and successful attempt at adding feet to my soap dish.
This technique could be used to make more permanent fixtures that can be reattached to the printer. You could use this to 3D print customizations onto previously printed or mass produced items. It may require more plastic than support material, but could save the time and effort of removing stuck-on scaffolding. It’s always good to have multiple options to the same result.
If you do 3D print some fixtures, please share the process or results with me! Happy 3D printing!
p.s. I’m running a 3D printed gift exchange this holiday season. If you have the skills and the means, please join up and 3D print a gift for someone else! Join here.
Humanity reached a big milestone this year. For millions of years, every tool that homo sapiens has ever made has had one thing in common: it was made on Earth.
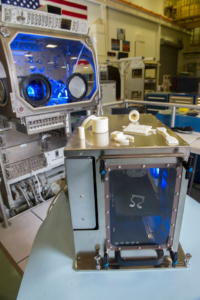
The first 3D printer in space from Made in Space
But this year we successfully launched a 3D printer into space, marking the first time in human history that we can make an object off the surface of the earth. The group that has made this possible (besides NASA) is Made in Space, a company founded to prove that off-world additive manufacturing is both possible and the next step in space colonization. I talked with Made in Space co-founder Mike Chen about the future of making in space.
Getting to space is getting easier each year, but even with the new SpaceX Dragon missions, the cost of putting a kilogram of mass on the International Space Station is still about US$22,000. That makes it unreachable for most of us. In 2010 Made in Space saw a chance to disrupt this rocket-powered supply chain and enable manufacturing in space using newly available consumer 3D printer technology. They ran countless tests of existing consumer 3D printers onboard a reduced gravity aircraft (aka the Vomit Comet) to find a suitable design. Mike explained the problem, “We actually get a few emails a week [where] someone takes a printer and turns it upside down or sideways and says, ‘See? This prints upside down, so why wouldn’t this printer work in space?’ You know, you’re just not really thinking it through. Gravity is still there, acting as a force to hold things in place.” Remove that force and everything starts to oscillate. Also, heating elements in microgravity are difficult because there is no natural convection to circulate hot air, making passive cooling nearly impossible. The machine also needs to withstand the violence of launch, which may be the biggest build challenge. The Made in Space team decided that they needed a design of their own.
Mike says that’s one of the reasons the space stations exists, to experiment with how different systems act in micro-gravity. This is very much an experiment and is being treated as such. On November 17th, the printer was installed in the Microgravity Science Glovebox (MSG), a facility on the ISS dedicated to possibly harmful experiments, and a perfect place to safely test new technologies. Now that the machine is ready, the first extraterrestrial manufacturing will commence soon.
Zero Gravity 3D printer, image courtesy of Made in Space
I pressed Mike for some details on the machine itself. It’s a Material Extrusion machine like most consumer 3D printers on the market. That means it’s full of steppers; everyone loves steppers. In order to limit their unknown variables, they decided to use ABS plastic as their material. It’s one of the most well known polymers and is a very useful material. ABS does have toxic offgassing, so in addition to being housed in the MSG, there are environmental filters to protect the astronauts’ precious atmosphere. A 3D printing professional will also appreciate these simple design guidelines presented by Future Engineers who host a challenge to inspire schoolkids to design an object to be printed in space. Those guidelines also call out the build volume of 5cm x 10cm x 5cm and specific design hazards posed to an astronaut. Printed parts must not have any support structures or require post processing, which could release small particles in the air that can get in everything, including the astronauts. The standard 45° overhang is present as well. Maybe the next machine will be a 5 axis robot that can follow clever 3D toolpaths and truly print any geometry.
This machine has been designed with multiple design constraints to contend with. These constraints really drove Made in Space to develop their own machine and IP. On the ISS, an hour of an astronaut’s precious time will cost about $50,000. That means no fiddling with extruder tensions or babysitting the machine as it prints. So the printer only has one button, the ON button. Everything else is handled from ground control thanks to the MSG’s video cameras.
The big question is, what will they print first? Made in Space is being very secretive about this, but we won’t have to wait long to find out. The first print will be a special milestone, but subsequent prints will be test coupons that can be compared to prints made in an identical machine on terra firma. After proving the printer’s quality, there is a long list of useful objects that are needed on the ISS. There are hundreds of replacement parts already in storage on the station, but in the future those parts will be made on demand. At that point each kilo of printer material becomes a lot more valuable and versatile. There is even new opportunities to improve the lives of the astronauts by allowing family members to send digital gifts into orbit. In 2009 Randy Bresnik’s daughter was born while he was on an ISS mission. Imagine in addition to a photograph, Randy holding a 3D print of the newest Bresnik while passing out bubblegum cigars to his fellow astronauts.
You too can design something to be produced in space. Mike was keen on energizing the thousands of brand new 3D designers in the world to help solve problems in space. This machine gives an amazing amount of access to the 3D printing community on Earth. Made in Space is very receptive to ideas about what should be manufactured in space. Reach out and find a novel solution to a unique problem and there may even be a commercial benefit in it for you. See what Made in Space is doing on their website and follow Mike Chen on twitter: @MikeChen. These are exciting days.
On Wednesday, Feb 19th 5:30-8:00 p.m Hive 76 will be at The Philadelphia Museum of Art!
Come out and support us on this PAY WHAT YOU WISH ADMISSION night. Let us share and explain some of our great projects while you view some of the Museum’s amazing collection for as little as a penny!
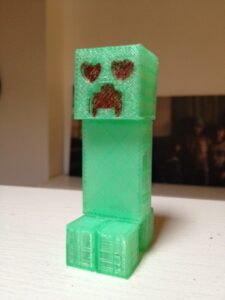
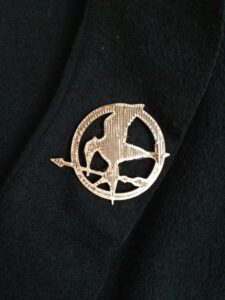
Got a sweetheart? Want to meet a sweetheart? David and Leslie are back to share the Valentine’s love. Make sweet gifts and learn about 3D printing and paper circuits at the same time. For the gamer in your life, there’s a Valentine Creeper. Got an inspirational do-gooder? Here’s a movie inspired MockingJay pin. Just want to show you care? Well, they’re working on a pixel heart necklace/keychain, that is sure to please.
While your piece prints, make a Valentine card that will illuminate your sweetheart’s soul. Bring some materials from around your house and combine them with a variety of papers, copper tape, LED and battery to create the perfect paper circuit. If you love crafting and electronics, you are about to experience maker heaven. If you’ve never been here before, you can tour the space and find out more about other member’s projects. Munchies will be on hand. Don’t forget to comment below so we know you are coming!
Three more things in my house require a remote control now, and one of them is the streetlight in front of my house. Ever since I heard about a hacked streetlight at the Guerrilla Drive in for Back to the Future in 2009, I have been turning off the streetlight on Darien Street by carefully aiming a laser dot at the light sensor on top of the streetlight. The light sensors on most streetlights face west to catch the last photons from the fading sunset before illuminating for the night—and this one faces right into the third floor of my house. It is very important to me to be able to choose to sit in the cozy dark, save my city some money, and not contribute to light pollution for a minute.
Just recently I revamped the process with a new, permanent laser and remote control system. Here it is in action:
I’ll show you how … Continue reading “Civic infrastructure hacking: laser-controlled streetlight.”
Every single paper printer I have ever owned has been a constant source of pain and expense [example]. My experience with 3D printers thus far has been slightly better, but a magnitude cooler. The payoff for designing and printing your own real thing out of plastic is a real joy. That’s why some people call me obsessed with these 3D printers, and also why I feel the need to share!
Learn to print in 3D! We are running our SketchUp class again with 2 new dates: 4/17 and 5/1. Both Sundays and both from 10am – 3pm. [avoiding religion jokes here] These dates are separate; it’s not a 2-part class.
Adam K. works on getting axis movement on the RepRap Huxley
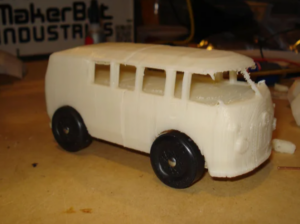
Back in 2009, we ordered our first 3D printer, the MakerBot Cupcake. Since then, we’ve become pros at fixing, modifying, and mostly breaking it. We’ve even created new, awesome products for it which have been adopted by a good portion of the 3D printing community, and even sold by MakerBot themselves.
Shortly after completing our Makerbot, once-member fynflood decided to start building the RepRap Mendel, which is the 2nd generation of the RepRap Project’s 3D printer. He started by printing all of the pieces on our MakerBot, which took over 20 hours to complete, and gathered all of the required hardware with help from many of our members. A printer was born out of Hive76, and life was good. A few months later, there was a post on the reprap aggregation pipe about a new iteration of the reprap, called the Mendel Mini (now the RepRap Huxley), which has a similar build volume to the MakerBot, but can be assembled for under half the cost. Fynflood set out to print the parts on his Mendel, while I gathered all the required hardware and electronics. After a few months break over the summer, and a few more months being busy with the Holidays, the Huxley is now complete! Our printer’s baby made a baby!
At this very moment, we have 2 MakerBots and the Huxley all going at the same time at the space! If any more printers show up, we’ll probably have to start giving away USB Typewriters just to make room! Really, it’s an exciting time to be printing at Hive76, so if you have any interest in learning how 3D printers work, or even building your own, come by for open house on Wednesdays and check out all the awesome things we’re making!
Hit the jump for a few videos and images from the first few prints!
The building we rent space from, 915 Studios, hosted Open Studios this past weekend. While most of us don’t make art, we did want to show off our cool projects to any visitors. I set up my DIY time lapse intervalometer and took pictures every 9 seconds all Saturday. Here is the completed video.


 We will have an announcement and official start in the 3D Printer village at noon on Saturday. But the basic premise is this:

