
If you are familiar with 3D printing, you may know of one of the most frustrating constraints in the process: overhangs. For those new to the tech, Material Extrusion machines like the RepRap and Ultimaker extrude molten plastic into air to produce 3D objects. But molten plastic is subject to gravity, so each bit of plastic needs to be supported by a previously printed layer.
There are a lot of solutions for this constraint. Designing an object not to have overhangs is one approach. Most 3D printers also use one or more materials to print supporting scaffolds for overhanging features. But removing the printed scaffold can sometimes be a mess. Take the example show here of a soap dish: 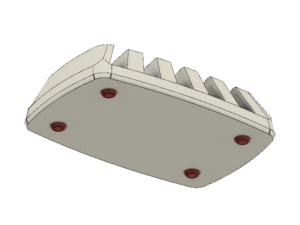
This model will print really well with the large flat surface placed on the build plate, but the four feet shown in red project below that surface. To print this as is, you would need support structure underneath the entire print with just the feet touching the print bed. Support scaffolding can be a mess, but I have a new method that can avoid support material altogether: flip the print over and print on the nice flat surface. With this approach, the trick is holding the model in place upside down while the feet are printed. The molten plastic will bond to the previously printed part, and the feet will become a permanent part of the soap dish.
3D printed fixtures are already a selling point and common practice in the professional additive manufacturing field, but I haven’t seen any examples of this among the DIYers and consumer 3D printer operators. A 3D printer has the ability to make any tool needed, even single use fixtures for a simple soap dish model. It only takes a bit of CAD to produce a working set of fixtures that will be printed and left installed on the print bed. Take a look at the embedded 3D model below and I will describe the process step-by-step.
- CAD your model. I use Fusion 360 because it is quite powerful, and free to use until I start making money.
- Create separate bodies for the fixtures and features that will be printed separately. Here the fixtures are in green, and the feet in red. They need to be separate bodies (not joined) so they can be exported separately.
- I created the fixtures for this soap dish by starting with a sketch that is in plane with the flat top of the soap dish. Then I extruded that sketch with the option “to object” so it would match the dish’s contour. I also included an offset. See that dialog box here:

- It helps that this model, the fixtures, and the feet are all symmetrical. The slicing software Slic3r will automatically center our parts in the printer, a feature we will rely on in this process.
- Create the additional features as separate bodies, see as red in the model above.
- Export 3 separate STLs: model, fixtures, additions. You can export STLs with multiple shells like the 2 fixtures or 4 feet with this trick.
- Slice and print your main model as normal.
- Slice the fixtures STL, but use the Brim setting to ensure really good bed adhesion.
- Edit the fixtures Gcode to remove your end.gcode and anything else that might turn off a heated build plate. Our fixtures need to stay stuck to the 3D printer. My first attempt failed because the print bed cooled down and the fixtures popped right off.
- Slice the additional features STL.
- Edit the additional fixtures Gcode to remove any start.gcode including homing commands.
- Add G92 Z0 to the top of this additional features Gcode. G92 will set the printer position to Z0.
- These two Gcode files will printed back to back with your intervention in the middle. Pay attention to the time.
- Print the fixtures Gcode. When it ends, place your model into the fixture. If it doesn’t have a snug fit, tweak the CAD to find the right geometry to hold your model. It doesn’t need to be clamped in, just secure enough that the nozzle won’t move your model.
- Now manually move the nozzle so that the tip is right at the flat “underside” of the model. Also home X and Y in case they shifted.
- Print the additional features Gcode. Keep a finger on the power or reset button. My second attempt to print this failed because I forgot the G92 Z0 and smushed the nozzle into my print.
- If all goes according to plan, the printer will add your additional features directly to your existing model.
Check out a timelapse of my third and successful attempt at adding feet to my soap dish.

This technique could be used to make more permanent fixtures that can be reattached to the printer. You could use this to 3D print customizations onto previously printed or mass produced items. It may require more plastic than support material, but could save the time and effort of removing stuck-on scaffolding. It’s always good to have multiple options to the same result.
If you do 3D print some fixtures, please share the process or results with me! Happy 3D printing!
p.s. I’m running a 3D printed gift exchange this holiday season. If you have the skills and the means, please join up and 3D print a gift for someone else! Join here.