Drexel Design Futures, Bacterial Cellulose (and a world record, maybe?)

Super-wide screen made from a single large sheet of bacterial cellulose “paper”

PJ and a number of other Hive members have been fortunate enough to participate in preparations for the Drexel Design Futures Lab “Projects 12/13” exhibition.  PJ was almost certainly the most involved Hive contributor — he helped with the development of a number of key software elements for several of the exhibits.

Side view of a BC culture, showing the cellulose pellicle (white “gel” on surface), growth medium and some bacteria/yeast colonies (dark brown structures).  The bubbles are CO2 produced by the yeast.

I had grown some fairly large sheets of bacterial cellulose in the past, and was interested in having an excuse to grow something even larger — so sign me up!  Tashia wanted a sheet that started out about 4’x8′ so that the final screen could be cropped to dimensions that were about the size of a slightly gigantic person.I wound up getting involved in the creation of a special display screen that was part of an interactive piece which allows people to “play” with a computer model of bacterial swarms.  This piece was part of Tashia Tucker’s exhibit, and she wanted an “organic looking” display surface. After some brainstorming that included condemnations of the high price of silicone etc., PJ suggested bacterial cellulose.  What!?  The idea of a movie screen made by real bacteria to show movies of simulated bacteria was too “meta” to pass up.

Yikes — this was literally a tall order.  Bacterial Cellulose (BC) is created by the same organisms that are used to ferment Kombucha — in fact, the “Shroom” or “Scoby” in a Kombucha culture is a big lump of cellulose.  So this was simple, in principle, but the scale of the piece left a lot of novel details that had to be worked out.

Continue reading “Drexel Design Futures, Bacterial Cellulose (and a world record, maybe?)”

Hand-crafted Charlie-Plexed Tile

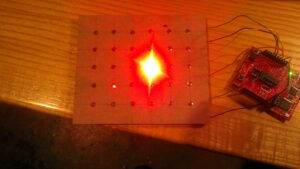
This 5×6 LED tile is a key component in a secret project that I’m developing (in secret) with some other folks (whose names shall remain a secret).

Why be so public about something so secret? Because this tile uses a layout technique that lets you build charlie-plexed LED arrays quickly and cheaply — and that’s something worth sharing.

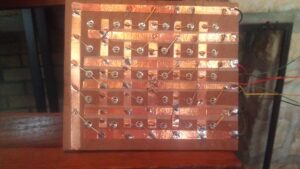
You need to flip the tile over in order to see what’s special about it. Here’s a quick list of features that make the assembly what it is:

  • The back of the tile has six “column” conductors and six “row” conductors.
  • These column and row conductors are connected along the diagonal of the row/column array.  At all other points in the matrix, the row and column conductors are isolated via a layer of masking tape.
  • LEDs above the diagonal have their cathode connected to the conductive row immediately above the LED.  LEDs on or below the diagonal have their cathode connected to the conductive row immediately below the LED.
  • All LEDs have their anode connected to the column that is to their immediate left.

The resulting circuit allows you to individually address any of the thirty LEDs in this 5×6 matrix using only six lines from a micro-controller. Continue reading “Hand-crafted Charlie-Plexed Tile”

Oolong, and Thanks For All The Mitch!

Zen and the art of soldering …

This Friday, we were able to inaugurate our newly completed class space with a most auspicious visitor — Mitch Altman!

PJ, Brendan, Robert et al were working until the wee hours the night before making sure that the space was ready to rock — and it was — literally.

Mitch arrived a bit before the appointed time, snapped a few photos, schmoozed, chowed down some local Chinese food etc. and, while documenting our stash of Elephant Heads,

Even this Diavolino was glad to see Mitch

anointed Hive76 as the most organized hacker space he’s seen. Quartermaster Brendan took appropriate pride in the observation.

Mitch basically talked about the Maker/Hacker movement in general, showed some of the kits that were keeping him company on the train, and weaved it all in a thematic web reminiscent of Arlo Guthrie’s is-this-guy-rambling-no-holy-shit-he’s-a-genius-because-it-all-makes-sense-in-the-end style.

After that, everyone bought a kit or two and lost themselves in the task of soldering.  I don’t know whether it’s the solder fumes or just the act of soldering itself, but I felt pretty good at the end of it all.

The new space is completely awesome and turned out to be nearly perfect for the event. Hats off to Brendan, Robert, PJ and Jordan!

Crafty Computer …

Back-lit view of paper and foil micro-controller board

After visiting The Hacktory’s “Soft Circuit” event, PJ and I were inspired to take a stab at making some micro-controller circuits using alternative, “high/low tech” approaches.  PJ made an MCU circuit using conductive paint (has potential, but needs some tweaks).  I opted to try a circuit board using metal leaf.  That happened to work on the first shot — although careful scrutiny of the picture on the left suggests there was some luck involved (there are holes in the circuit that come dangerously close to wrecking it). Continue reading “Crafty Computer …”

Instrument DIY

DIY Scale (and some other fine instruments)

Ok, you probably can’t make the baby grand in this picture, and even the metronome is likely to be a serious DIY challenge — but you can definitely make a pretty accurate DIY scale, and you can do it cheaply and easily.

I needed an accurate scale for a science project and knocked this baby together (based on this design) using found parts.  I was able to easily measure to centi-gram precision and with a little care, a scale like this could be tuned to measure to milligram precision.

Precision (the ability to discriminate between differences in mass) is largely a matter of careful construction — accuracy (the ability to weigh to an agreed upon standard) is another matter altogether,  and it basically hinges on having an accurate reference.  Fortunately, a great institution, born of Philly — the U.S. Mint — was wise enough to make Nickels and Pennies in rather convenient dimensions.  It turns out that nickels are 5.000 grams and pennies are 2.500 grams — so you not only have sub-milligram accurate references of convenient size — you also have an easy way to cross-check your scale by using nickels to weigh pennies and vice-versa.

Details of DIY Scale

The zoomed in photo shows most of the essential elements of construction.  Basically, I used a threaded 10-24 rod for the balance (10-32 would have been a better choice).  I used a wall-board razor as my knife-edge pivot point.  Two angle-brackets served as a hard, flat surface for the knife edge.  A nickel with a hole in it and some thread served as a reference weight (I wound up with a whole array of perforated nickels and pennies). A wall-board T-square served to measure the distance from the pivot to the reference weight.  I used an index card and a small mirror to make a sliding mirror in order to read the position of the weight w/o parallax error.  The whole shootin’-match was held on a stand that was salvaged from a cheap drill-press.  Measurements were performed by reading the distance between the movable weight and the pivot point, and entering that value in a Google Docs spreadsheet.

I definitely could have purchased a milligram scale for far less than this cost me in terms of spare time, but I learned a lot about scales in the process.  Almost all of it was stuff that I knew “in principle” — but actually building the scale infused my arm-chair knowledge with real-world experience, yielding an alloy whose properties seem to have exceeded its constituent parts.

The scale was nowhere near large enough to measure my satisfaction, but I estimate that this exercise yielded just about one metric ton of fun.

Jury-rig-igami

Here’s a hack that managed to make me happier than it probably should have … I was in a phone conference recently and was having trouble juggling my phone while typing on my computer.  I really couldn’t leave the meeting and was getting a little irked with the situation … and then I happened to spot a 3×5 index card.  A few quick folds and I had a perfectly good phone stand … irk be gone.

I’m not sure why this was such a kick — maybe the fact that it was so simple and stable combined with the fact that I conceived and executed the entire idea while participating in a meeting.  Plus, it really was a big improvement in my overall comfort at the moment.

At any rate, if you’re interested in making something similar, I present the following instructional video:

Beagle Bone!

Just bought myself a Beagle Bone as an early Xmas present.  I’m tempted to write a long, gushy tome about it, but for the sake of folks reading this, I’ll restrain myself.   I’ll just offer that if you like Arduino, you’ll adore Beagle Bone — in my view, it leapfrogs every physical computing platform out there,  and it’s cheap too.  I got one for $80 + shipping — about the same price as an Arduino with an ethernet shield — and the BB is about 1000x the machine.

To begin with, it has node.js baked right into its Ångström Linux OS.  This node.js installation is extended with a “Wiring-like” API.  Then add the fact that BB “sketches” (for lack of a better term) are edited right in your favorite browser, using the Cloud9 IDE.  Cloud9 is clean and simple and it supports the essential IDE features that you might expect — a decent editor with code colorization, management of the files that comprise a project, an interactive debugger etc.  The idea of a web-enabled physical computing platform that is itself programmed using a web interface seems so obvious and so “right” that it feels like it was always meant to be.   Pure elegance meets sheer genius.

At any rate, the fact that this puppy is an outstanding physical computing platform with righteous networking capabilities makes it about the perfect platform for Internet Of Things architectures, so that’s where I’m focusing for now.

Since I have a background in process control systems and a bit of a bias towards Philly-grown tech,  I settled on NimBits for my back-end.  It has all the attributes of a real process control historian with a cloud architecture and some nice bells and whistles to boot.  Since NimBits counts an XMPP based API among its various access methods, I wrote a little study to see if I could send IMs using node.js.  Turns out it’s incredibly simple (check out the picture)  This app doesn’t push stuff to NimBits (yet), but it’s only a half-step away from it — and being able to have a physical computing platform send you IMs is pretty darn useful in its own right.

Keep an eye out here for more Beagle Bone and Internet Of Things stuff.  We live in fascinating times!

Moby Dick

Been reading Moby Dick lately on my Nook Color.  What a great, antebellum stew of literature, science and technology.  So may great quotes, so many scientific observations that still hold true 160 years later (and an amusing smattering of notions that have been turned on their heads in the interim).

You can download a copy from Project Gutenberg.  I used EPUB format on my Nook.  Very readable, and I love the embedded highlighting and annotation features.

And to close, here’s my most recent highlight, from a section where the Pequod slaughters a Right Whale solely for the sake of using its head as a counterweight to a Sperm Whale head attached to the other side of the boat:

“Didn’t I tell you so?” said Flask; “yes, you’ll soon see this right whale’s head hoisted up opposite that parmacetti’s.”

In good time, Flask’s saying proved true. As before, the Pequod steeply leaned over towards the sperm whale’s head, now, by the counterpoise of both heads, she regained her even keel; though sorely strained, you may well believe. So, when on one side you hoist in Locke’s head, you go over that way; but now, on the other side, hoist in Kant’s and you come back again; but in very poor plight. Thus, some minds for ever keep trimming boat. Oh, ye foolish! throw all these thunder-heads overboard, and then you will float light and right.

Microbial Cellulose — 2 A2 Sheets Worth

44x18 cellulose sheet drying on clothesline

Back in mid September, we made a batch of Bacterial Cellulose in two 44″ x 18″ tray bioreactors, using Adam Korshid’s “blanco cellulose” medium (sugar, yeast and apple-cider vinegar in ratios carefully measured by eye and tongue).  About two weeks later, one of the cultures had essentially failed, but the other had blossomed with a vengeance, coughing up a giant, off-while pellicle that was about 3/8 inches thick and probably weighing a good 10 pounds.  For what it’s worth, it was also quite a smelly beast.  In fact, the smell largely motivated the timing of the harvest (kind of a “get-that-friggin-thing-outta-here” situation).  One unexpected benefit of the stench was that I was able to identify butyric acid as the main offender — so the absence tea in the culture seems to result in increased butyric acid production. Possibly a consequence of the low nitrogen content of the “blanco” medium?  It might be interesting to research the topic …

At any rate, the 44×18 sheet was ultimately dried and delivered to Ann Saintpeter as promised.  We’ll see what she prints on it, if anything.  While the sheet was drying, I discovered that you could kill the smell by dusting it with baking soda.  It also turns out I was late to that particular party — apparently baking soda is renown as an odor killer precisely because it forms salts with organic acids that tend to be some of the main components of many unpleasant odors.

The sheet ultimately dried to look very much like a giant, soft tortilla, complete with a dusty surface (courtesy of the baking soda).  It also ended up with some mild scorch marks, since I was trying to dry it in a hotel room, using the courtesy hair-dryer and iron.  If nothing else, the scorch marks helped with the tortilla-like appearance.

I’m currently embarking on a little experiment to study factors influencing cellulose production, including density of the substrate (i.e. how much sugar to hit the production “sweet spot”, so to speak) and substrate type (supposedly glycerin is the ultimate feed-stock).  If there are any results worth publishing, we will do so — possibly with hardcopies on microbial cellulose paper.

Open House, September 14th (and MMMM follow-up)

We had a solid, but uncrowded open house last night, complete with all the usual unstructured goings-on and a side order of semi-structured activities.

Two "Bacterial Cellulose Bioreactors"

Adam Korshid, UArts Industrial Design alum and local “kombuchaneer” stopped by to share some Acetobacter Xylinum cultures and give Pez’s microbial cellulose operation a re-boot.  We were joined by local artist and 915 building neighbor Ann Saintpeter.  We mixed up two 44″ by 18″ trays with a special “blanco cellulose” medium in the form of sugar, yeast and apple-cider vinegar. To prepare the medium we used a rigorous, proven methodology that is generally referred to in the relevant scientific literature as TLAR (“that looks about right”) and verified our efforts using the TTAR2 methodology (“that tastes about right, too”) — as if we know what constitutes A. Xylinum’s standards of delciousness.  Then we turned the bacteria loose in the pond to do their thing.  We’ll deliver the resulting paper to Ann to see if it has a place in her art.

Chris and Brendan pop the hood on an Epson 7700 in need of TLC

Ann also donated an Epson 7700 that needs some TLC.   We spent some time working on it, and learned a thing or two.  For example, we learned how to reset the counter on the maintenance tank (yay, $60 unnecessary expense avoided) and also tried to clear the black ink line by “replacing” the cartridge (boo, $50 unnecessary expense incurred when the printer apparently rejected our “spent” ink cartridge for good).  We’ll re-flash those ink cartridges and show the printer who’s boss — and the printer is well worth the effort involved in rescue.

Dan and some-guy-whose-name-i-didnt-catch were off in a corner working on developing something using some framework whose-name-i-didnt-catch.  Maybe Dan will edit this part.

And Monday’s MMM workshop — Great Success — we had five or six fresh faces and it seemed that a good time was had by all.  We were prepared with lecture materials, if needed, but everyone in attendance seemed to be in a loosely structured kind of mood — so loose, in fact, that we didn’t bother to take a single picture.  PJ has suggested a Halloween theme for the next workshop, and we’ll probably prepare some reading and code snippets in advance on things like LEDs (charlie-plexing, POV and the like)  and maybe some schematics and code involving upcycling old CD drives into creepy animatronics.