Real–Life Redstone Lamp Replica Controlled by a Raspberry Pi

Early in my gameplay in Minecraft I began making redstone contraptions. For those that don’t know Minecraft, you can use resources in the game to make analog electronics. People have extended this feature to build entire working computers all in redstone logic in Minecraft.

Redstone lamp (activated)

I only used redstone to make traps and novel machines, but the strong connection between redstone and electronics led me to imagine extending these machines out into the real world. I figured the easiest thing to make was the Redstone Lamp, pictured to the right. The redstone lamp is a block that will provide light when powered. My real life replica redstone lamp does the same thing. It lights up when a redstone lamp ingame is lit up. Here is a video of how it works:

I’ll describe how I got to a working replica in a few stages.

Software

I am not the best getting started with software projects, so I enlisted the help of Vince who was hanging out a bunch at Hive76. We made a quick prototype with a python Minecraft client called pyCraft, an Arduino, and transistor, and a papercraft redstone lamp. You can see that first success here.

While I worked on the physical stuff, Vince moved away and Kyle Yankanich stepped in to help me finalize some stuff. PyCraft connects to any server as a simple chat client, in our case as the user LAMPBOT. Kyle wrote a plugin for pyCraft that listens for a whisper of “on” or “off” and sets pin 16 on the Raspberry Pi’s GPIO high or low respectively. You can download my fork of pyCraft here with Kyle’s plugin and my shell script to start the client. I set my home server to Offline mode so that I wouldn’t need to purchase another Minecraft account.

Hardware

Redstone lamp replica

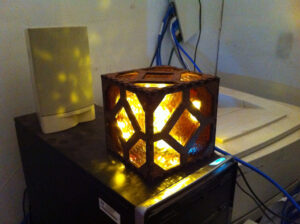
For the replica, I did my best to turn pixels into straight lines. I designed a laser-cuttable box in six parts with finger joints on the edges. I used 16 finger joints because the a block is 16 pixels wide. The material is MDF with a zebra wood veneer laminated on top. I laser cut six sides and glued all but one together. I acquired some amber cathedral glass from Warner Stained Glass, cut, and glued it in place with silicone adhesive. The RPi is attached to a MDF board sitting diagonally in the cube. The LEDs were torn from inside a failbot and glued around the RPi to light up the inside as much as possible.

In order to turn the LEDs on and off, we use the signal from the RPi GPIO to control an NPN transistor and turn the lights on and off. There is a fritzing wiring diagram of the electronics here. On the NPN transistor, the Collector is the negative lead from the LEDs, the Base is connected to a 100KΩ resistor and then pin 16, and the Emitter goes to the ground on the LED power supply.

There’s no room for a power regulator, so there are two power sources and ethernet running through a hole in the back.

Ingame Stuff

Ingame redstone

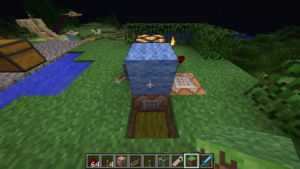
To trigger the lamp, command blocks are used ingame as you can see to the left. When a lever is thrown powering a specific redstone lamp, we also power a command block that sends the server command:
/tell LAMPBOT on
We also send the inverted signal to a different command block that outputs:
/tell LAMPBOT off
This can be used on any server with no mods. You would need a Minecraft account for the lamp so you don’t expose your server to cracked clients. The server this was designed for runs Minecraft 1.6.4 now, but in 1.7.2 the /testforblock command and a clock could also trigger the lamp.

I really hope you take what we have done here and continue to connect your Minecraft creations to the real world. Enjoy!

Hand-crafted Charlie-Plexed Tile

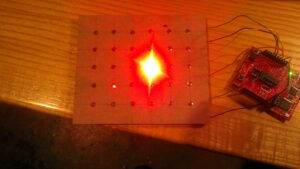
This 5×6 LED tile is a key component in a secret project that I’m developing (in secret) with some other folks (whose names shall remain a secret).

Why be so public about something so secret? Because this tile uses a layout technique that lets you build charlie-plexed LED arrays quickly and cheaply — and that’s something worth sharing.

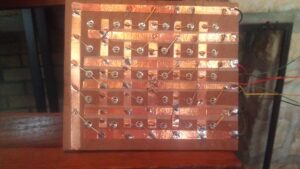
You need to flip the tile over in order to see what’s special about it. Here’s a quick list of features that make the assembly what it is:

  • The back of the tile has six “column” conductors and six “row” conductors.
  • These column and row conductors are connected along the diagonal of the row/column array.  At all other points in the matrix, the row and column conductors are isolated via a layer of masking tape.
  • LEDs above the diagonal have their cathode connected to the conductive row immediately above the LED.  LEDs on or below the diagonal have their cathode connected to the conductive row immediately below the LED.
  • All LEDs have their anode connected to the column that is to their immediate left.

The resulting circuit allows you to individually address any of the thirty LEDs in this 5×6 matrix using only six lines from a micro-controller. Continue reading “Hand-crafted Charlie-Plexed Tile”

Philly Tech Week – We’re Booked Solid

Monday – MMMM  Microcontroller Madness

Tuesday – DIY Music Night

Wednesday – Open House

Thursday – Game Night Featuring Tetris Arm Wrestling Tournament

Friday – PTW Gala demonstration (offsite)

Events at Hive76 Monday through Thursday start at 7pm and 

ARE OPEN TO THE PUBLIC.

Friday Gala Ticketing information available here.

Crafty Computer …

Back-lit view of paper and foil micro-controller board

After visiting The Hacktory’s “Soft Circuit” event, PJ and I were inspired to take a stab at making some micro-controller circuits using alternative, “high/low tech” approaches.  PJ made an MCU circuit using conductive paint (has potential, but needs some tweaks).  I opted to try a circuit board using metal leaf.  That happened to work on the first shot — although careful scrutiny of the picture on the left suggests there was some luck involved (there are holes in the circuit that come dangerously close to wrecking it). Continue reading “Crafty Computer …”

Beagle Bone!

Just bought myself a Beagle Bone as an early Xmas present.  I’m tempted to write a long, gushy tome about it, but for the sake of folks reading this, I’ll restrain myself.   I’ll just offer that if you like Arduino, you’ll adore Beagle Bone — in my view, it leapfrogs every physical computing platform out there,  and it’s cheap too.  I got one for $80 + shipping — about the same price as an Arduino with an ethernet shield — and the BB is about 1000x the machine.

To begin with, it has node.js baked right into its Ångström Linux OS.  This node.js installation is extended with a “Wiring-like” API.  Then add the fact that BB “sketches” (for lack of a better term) are edited right in your favorite browser, using the Cloud9 IDE.  Cloud9 is clean and simple and it supports the essential IDE features that you might expect — a decent editor with code colorization, management of the files that comprise a project, an interactive debugger etc.  The idea of a web-enabled physical computing platform that is itself programmed using a web interface seems so obvious and so “right” that it feels like it was always meant to be.   Pure elegance meets sheer genius.

At any rate, the fact that this puppy is an outstanding physical computing platform with righteous networking capabilities makes it about the perfect platform for Internet Of Things architectures, so that’s where I’m focusing for now.

Since I have a background in process control systems and a bit of a bias towards Philly-grown tech,  I settled on NimBits for my back-end.  It has all the attributes of a real process control historian with a cloud architecture and some nice bells and whistles to boot.  Since NimBits counts an XMPP based API among its various access methods, I wrote a little study to see if I could send IMs using node.js.  Turns out it’s incredibly simple (check out the picture)  This app doesn’t push stuff to NimBits (yet), but it’s only a half-step away from it — and being able to have a physical computing platform send you IMs is pretty darn useful in its own right.

Keep an eye out here for more Beagle Bone and Internet Of Things stuff.  We live in fascinating times!

TIWrap makes your LaunchPad steak house handle like an Arduino bistro

We whipped up a Wiring-ish wrapper for the MSP430 a while back in order to simplify the task of porting Arduino libraries for use with MSP430 microcontrollers.  It turns out, we weren’t the only ones that thought of it.  PJ spotted a post on Hack A Day where someone unveiled something remarkably similar, and that post resulted in at least two other folks besides us posting their similar ideas — so there are at least four of these wrapper libraries out there.

Naturally, we’d like to think that ours is the best of the bunch, and the best named too — TIWrap.  Seriously, though, we seem to be genuinely different in that that we have bundled in actual libraries ported from Arduino, such as the HD44780 and MAX7221 libraries.  There are some piezo buzzer libraries and we expect to add some Charlieplexing utilities soon.  You can get a copy of TiWrap here.

The demo above is a “Fancy Flashlight” concept proposed by Matt Torbin.   It’s just one MSP430, two LEDs, a button and a bit of code which you can find in the TiWrap examples.

And in case the title left you puzzled …

Hive76 Intro to Microcontrollers — News From The Front

… Soon, I’m gonna have to switch places with some of the students in the class


It was weird to hit the Wednesday Hive Open House and see a handful of original MSP430 projects.  The video above is an LED chaser effect that Chris Thompson whipped up based on concepts from the first session of the MSP430 class.  As the old saying goes — teach a geek to fish and you’ll soon have LED encrusted fish.

Speaking of LEDs, here’s a Morse Code blinker project that Chris did.  Mostly a cut & paste job, but if nothing else, it makes the point that there are plenty of  MSP430 code samples out there and that it’s relatively easy to use them once you know the tools.

Audience

If you are an artist who wants to create small, cost effective interactive systems or a stone geek who wants to actually make a computer do something physical, this is a must-attend course.  We’ll have labs that will show you how to flash gobs of LEDs with just a few IO pins, run stepper motors, read switches, generate sounds, read analog signals and even have MCUs communicate.   You’ll leave with sample code and enough experience to apply this tech  immediately.
We’ll be running this class again, for sure.

Send any questions to: mikehogan62 AT gmail DOT com