Again, this event is open to all! Lots of RF stuff will be happening. If at all curious, please come out and check out the festivities. Amateur radio. Amateur radio digital modes. Satellite communication. FOOD. SDR radio. Mesh networking and more.
Hope to see you at these events. …. — .–. . / – — / … . . / -.– — ..- / .- – / – …. . … . / . …- . -. – …
On Thursday May 5th, Hive76 will be hosting DIY Music Night which will engage participants of all experience levels in electronics, programming, and sound. The event is FREE to attend, participants can pay to take home their instructional materials at cost.
There are two activities to do, design your own analog synthesizer and design your own computer interface. Participants will be able to do both activities if they wish.
Build your own synthesizer
Using breadboards and a handful of very affordable components, participants will get hands on instruction in the field of analog signals. We will be making headphone amplifiers, oscillators, noise generators, filters, and more!Build your own USB control surface
Using a specialized Arduino board called a Teensy participants will get to create USB MIDI control surfaces that will work with any music software. Instructors will be helping everyone to adapt sample code for their unique design. Learn how easy and inexpensive it can be to create your own controller customized to your needs!
7:00 PM
Free to attend, $10 to take home a synthesizer
1901 S 9th St Philadelphia, PA 19148
Entrance is on Dudley st in the middle of the block, look for the touchpad to call a Hive76 member
Hello, mortals! Perhaps you saw me at Maker Faire NY over the weekend; I was the orange dude with the screen head taking your picture with my face. Well not only did your souls add a few thousand years to my already infinitely long lifespan, they got uploaded to the internet, where myself and others can browse them at our leisure from the comfort of our own time traveling spaceships. Have a look yourselves, and I’ll see you all in the past (or in the future, from your puny human perspectives).
Hot on the heels of their wildly successful Build My Lab contest (still 5 days left to enter!!), our friends at Tekla Labs are putting together another breakthrough event to unite DIYers and the science community (NOTE: These events are happening in Berkeley, CA).
The Point of Care Diagnostics IdeaLab, Tekla Labs, and the Center for Emerging and Neglected Diseases is excited to announce a series of coordinated events to promote global health design and innovation.
January 9, 2014 Diagnostics by Design: A Workshop on the design, development, and implementation of Global Health Technologies (details/registration here)
January 10, 2014 The 6th Annual CEND Symposium. Academia and the Global Health Pipeline: Basic Science Innovation and Translation (register here)
January 11-12, 2014 Diagnostics by Design: A Hack Day for Global Health (register here)
The Diagnostics by Design workshop is an interdisciplinary forum for discussing the challenges and lessons learned in developing and implementing global health technologies, specifically at the point of care. Through interactive talks, a panel discussion with experts from industry and academia, and a hands-on build session, we will explore the challenges associated with translating technologies beyond the lab. This workshop will draw on the expertise and experience of individuals from across disciplines to explore collaborative solutions to global health issues. The workshop will feature Columbia Professor and mChip inventor Samuel Sia as the keynote speaker. See our eventbrite page for a full list of speakers and panelists and for registration.
The Diagnostics by Design hackathon is an interdisciplinary effort to bridge the gap between makers and do-it-yourself innovators and the sphere of global health. The event is posed as a challenge to participants: with minimal materials or through innovative coding, tackle a technological or informatic need in the space of point-of-care diagnostics. These can range from generating DIY lab equipment alternatives for medical clinics with limited resources, informatics for disease monitoring, or redesign of diagnostic tools for resource-limited settings. Attendees will be given a kit with some materials and have access to 3D printers, laser cutters, mills and more. Visit our eventbrite page for more details and to register.
Early in my gameplay in Minecraft I began making redstone contraptions. For those that don’t know Minecraft, you can use resources in the game to make analog electronics. People have extended this feature to build entire working computers all in redstone logic in Minecraft.
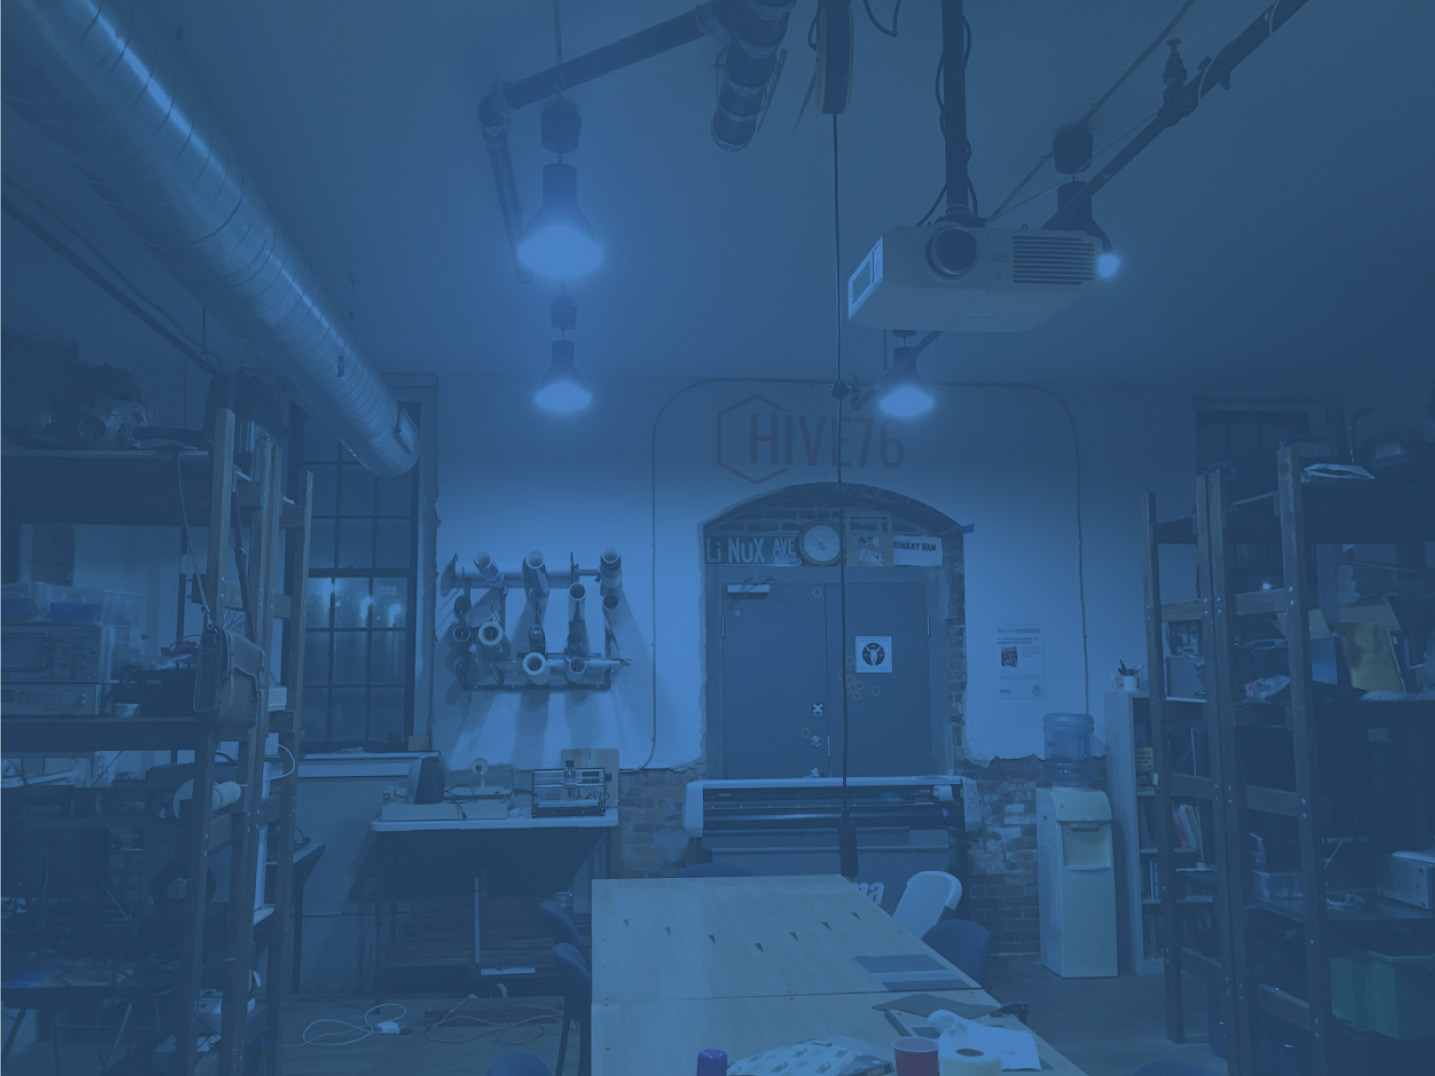
Redstone lamp (activated)
I only used redstone to make traps and novel machines, but the strong connection between redstone and electronics led me to imagine extending these machines out into the real world. I figured the easiest thing to make was the Redstone Lamp, pictured to the right. The redstone lamp is a block that will provide light when powered. My real life replica redstone lamp does the same thing. It lights up when a redstone lamp ingame is lit up. Here is a video of how it works:
I’ll describe how I got to a working replica in a few stages.
Software
I am not the best getting started with software projects, so I enlisted the help of Vince who was hanging out a bunch at Hive76. We made a quick prototype with a python Minecraft client called pyCraft, an Arduino, and transistor, and a papercraft redstone lamp. You can see that first success here.
While I worked on the physical stuff, Vince moved away and Kyle Yankanich stepped in to help me finalize some stuff. PyCraft connects to any server as a simple chat client, in our case as the user LAMPBOT. Kyle wrote a plugin for pyCraft that listens for a whisper of “on” or “off” and sets pin 16 on the Raspberry Pi’s GPIO high or low respectively. You can download my fork of pyCraft here with Kyle’s plugin and my shell script to start the client. I set my home server to Offline mode so that I wouldn’t need to purchase another Minecraft account.
Hardware
Redstone lamp replica
For the replica, I did my best to turn pixels into straight lines. I designed a laser-cuttable box in six parts with finger joints on the edges. I used 16 finger joints because the a block is 16 pixels wide. The material is MDF with a zebra wood veneer laminated on top. I laser cut six sides and glued all but one together. I acquired some amber cathedral glass from Warner Stained Glass, cut, and glued it in place with silicone adhesive. The RPi is attached to a MDF board sitting diagonally in the cube. The LEDs were torn from inside a failbot and glued around the RPi to light up the inside as much as possible.
In order to turn the LEDs on and off, we use the signal from the RPi GPIO to control an NPN transistor and turn the lights on and off. There is a fritzing wiring diagram of the electronics here. On the NPN transistor, the Collector is the negative lead from the LEDs, the Base is connected to a 100KΩ resistor and then pin 16, and the Emitter goes to the ground on the LED power supply.
There’s no room for a power regulator, so there are two power sources and ethernet running through a hole in the back.
Ingame Stuff
Ingame redstone
To trigger the lamp, command blocks are used ingame as you can see to the left. When a lever is thrown powering a specific redstone lamp, we also power a command block that sends the server command: /tell LAMPBOT on
We also send the inverted signal to a different command block that outputs: /tell LAMPBOT off
This can be used on any server with no mods. You would need a Minecraft account for the lamp so you don’t expose your server to cracked clients. The server this was designed for runs Minecraft 1.6.4 now, but in 1.7.2 the /testforblock command and a clock could also trigger the lamp.
I really hope you take what we have done here and continue to connect your Minecraft creations to the real world. Enjoy!
Three more things in my house require a remote control now, and one of them is the streetlight in front of my house. Ever since I heard about a hacked streetlight at the Guerrilla Drive in for Back to the Future in 2009, I have been turning off the streetlight on Darien Street by carefully aiming a laser dot at the light sensor on top of the streetlight. The light sensors on most streetlights face west to catch the last photons from the fading sunset before illuminating for the night—and this one faces right into the third floor of my house. It is very important to me to be able to choose to sit in the cozy dark, save my city some money, and not contribute to light pollution for a minute.
Just recently I revamped the process with a new, permanent laser and remote control system. Here it is in action:
I’ll show you how … Continue reading “Civic infrastructure hacking: laser-controlled streetlight.”
It didn’t take me and Robert long to find an RGB LED pushbutton. I composed a short part number using the NKK data sheet and found a KP0215ASBKG03RGB-2SJB. I made a simple perf board shield with the proper resistors for my Arduino Mega 1280 and re-learned Arduino to light it up.
This Thursday, please join us at a FREE exhibition of the work of Cornelius Varley (1800-1860) put on by the venerable American Philosophical Society. It is a fantastic exploration of the life work of this fellow tinkerer and inventor who’s insight and explorations reminds me a lot of our Hive76 members!
A few of us will also be presenting at this event! We will have live 3D sugar glass printing, exhibitions of Brendan’s boom cases, Dan’s 8 mm RockBox, PJ’s electronics, Corrie’s textiles and artwork, Chris Terrell’s wood burning, and maybe a few more things.
We hope to see you there! Deets and directions below.
Deets:
Free Refreshments (wine, food, music) will be provided at the event!! APS Requests your RSVP HERE: [email protected]
Thursday, June 6th, 2013
5:30-7:30 pm
APS Museum in Philosophical Hall
104 S. Fifth Street, Philadelphia, PA
upon first launch. That will make things a lot easier since the release is rather old by now.
I got some time to explore the Raspbian distro.
After seeing all of my efforts, Morfin couldn’t wait to give it a shot.
Eventually we got my favorite light-weight print controller github.com/kliment/printrun running an active 3D print. It really was incredible to have a $40 computer connected to the interwebs and sending gcode with a full GUI over python->USB-serial. It’s a bit too slow for computational slicing, but would probably be GREAT for a bot-farm. Note that you should also use pianobar instead of full-blown pithos for pandora audio. Note that the audio worked great after we ran the apt-get upgrades mentioned above.