New Hydroponics Set Up!

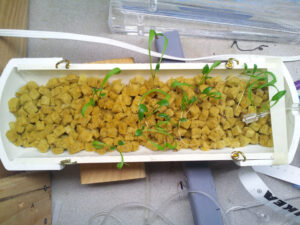
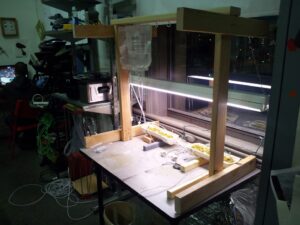
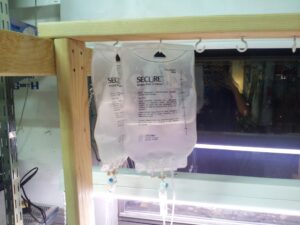
I finally finished the hydroponic garden I’ve been building at Hive76 for the past few months.   The plants have just started to sprout, so it will be at least another month before they can be harvested.  But when they are ready, if you want to take some cuttings for yourself at open house you’re more than welcome to.  Right now I am growing basil, thyme, oregano and morning glories.

Unfortunately, I’m spending the rest of the summer in Germany so I won’t be at open house to answer any questions in person, but I will be back in September. In the mean time I’ll start posting the blueprints of the hydrogarden, so anyone will be able to build one if they want.  Hope to have more of the details next week!

Thanks, to Pete for agreeing to watch my plants while I’m gone, Rob for letting me steal his wood and carpentry techniques to build the frame, and Jordan for helping to design the caster flat bed and general support!

Drexel Design Futures, Bacterial Cellulose (and a world record, maybe?)

Super-wide screen made from a single large sheet of bacterial cellulose “paper”

PJ and a number of other Hive members have been fortunate enough to participate in preparations for the Drexel Design Futures Lab “Projects 12/13” exhibition.  PJ was almost certainly the most involved Hive contributor — he helped with the development of a number of key software elements for several of the exhibits.

Side view of a BC culture, showing the cellulose pellicle (white “gel” on surface), growth medium and some bacteria/yeast colonies (dark brown structures).  The bubbles are CO2 produced by the yeast.

I had grown some fairly large sheets of bacterial cellulose in the past, and was interested in having an excuse to grow something even larger — so sign me up!  Tashia wanted a sheet that started out about 4’x8′ so that the final screen could be cropped to dimensions that were about the size of a slightly gigantic person.I wound up getting involved in the creation of a special display screen that was part of an interactive piece which allows people to “play” with a computer model of bacterial swarms.  This piece was part of Tashia Tucker’s exhibit, and she wanted an “organic looking” display surface. After some brainstorming that included condemnations of the high price of silicone etc., PJ suggested bacterial cellulose.  What!?  The idea of a movie screen made by real bacteria to show movies of simulated bacteria was too “meta” to pass up.

Yikes — this was literally a tall order.  Bacterial Cellulose (BC) is created by the same organisms that are used to ferment Kombucha — in fact, the “Shroom” or “Scoby” in a Kombucha culture is a big lump of cellulose.  So this was simple, in principle, but the scale of the piece left a lot of novel details that had to be worked out.

Continue reading “Drexel Design Futures, Bacterial Cellulose (and a world record, maybe?)”

Hydroponics Update

Spinach about a week after nutrients added.

 The spinach I was growing managed to complete most of its life cycle. Around a week after my last post I added the nutrient solution to the plants’ water, thats when they really started to take off.  I had one hiccup during the test run where I didn’t properly sent the flow rate of one the IV bags and half the nutrient solution was lost. If I was a little less… well lazy that day… I would have replaced it , but I didn’t.  So the IV bag ran out of nutrient solution and some of the plants died before they reached maturity.  Luckily, the rest of the plants managed to reach their flowering stage.  So overall, the IV bags were incredible useful. Thanks Jordan for the idea!

 Seeing how classes are starting to pick up, I figure now is a good time to stop the experiment and take some time to look over my notes.  But, I hope to have another prototype built by the end of next month. ( Btw, sorry for not being around open house lately to discuss hydroponics, I have a night class that meets at the same time this semester).

Speaking of which, a friend of mine who frequently stops by open house, Ian, has taken the plans of the hydroponic garden I built two years ago and built one of his own at home.  Suffice to say, the plants have grown wild and are firmly in control of his bedroom. Given how successful his garden has been, he’s inspired me to dust of my old plans and think about building another, LARGER, set up for just for show (the hydro setup currently at Hive is mainly for experimentation).  That’s all for now…

Spinach reaching maturity.

New Hydroponics Prototype!

New hydroponic setup… Let’s just say my carpentry skills are a little rusty.

So here is a quick update on my hydroponics setup at Hive76.  In my previous post I uploaded a video on a hydroponic garden I built in my basement two years ago.  My goal was to build the setup with as little moving parts as possible to ensure the garden required little maintenance.  With the hydroponic garden I am building at Hive76 I decided to keep to the spirit of simplicity but a completely different approach with it.

With my latest version I am using medical grade IV bags to store the water above the plants.  Then by attaching a mechanism to the IV bags known as a ‘flow controller’, gravity pulls the water from the bags to the plants below at a consistent rate.  The rate at which water flows through that controller be anywhere from 5 to 250 ml / hr.

The IV bags and flow controllers are great because they are very inexpensive (one IV bag and flow controller cost me a few dollars from medtecmedical.com).  Plus they can potentially be reused since they are being used on plants and not humans if you are careful to prevent contamination. But possible the most useful thing about using IV bags is that they require no energy to operate, which further reduces costs.

IV bags filled with water.

To evenly distribute the water that is supplied by the IV bags to the plants, I put the plants within a medium of rockwool cubes that are about 1 cubic centimeter in size.  The rockwool essentially acts as a sponge that takes the water that is supplied by the IV drip and evenly distributes it to all the plants within the container.

I’m testing my current hydroponic setup on spinach seeds at the moment.  The plants are still in their infancy so I have not added nutrients to their water supply yet but I plan to do so in about a week(adding too high a concentration of nutrients to young plants can damage their roots).  My short term goal is to monitor the spinach in my hydroponic setup through its entire life cycle, taking general notes along the way.  After the plants have finished their life cycle I want to take some time to build a second prototype and post its plans on Hive’s webpage. Hopefully by that point, the system will be a useful platform for scientific experimentation. Then the real fun can begin!!!

Gravity flow controller: controls the flow rate of liquid from the IV bags.
Germinating seed in rockwool and temperature probe.

Hydroponics at Hive76

My current project at Hive76 is working on indoor hydroponic systems.   The project comes from an interest in plants that I picked up from tending to my mother’s  garden as a child.   My family was fortunate to have enough land for a sizable garden when I was growing up, but now that I live near center city Philadelphia, good plots of land can be difficult to find. So I naturally turned to hydroponics because it is not limited by land area the same way that traditional farming is.

Hydroponics has the potential to revolutionize farming as we know it because it allows for plants to be grown in highly controlled environments.  This means that the light, water, and nutrients that plants need to thrive can be optimized to promote rapid growth while reducing waste and pollution.   Also, as mentioned before, hydroponics systems be built vertically instead of just horizontally, which is a huge benefit in dense urban environments like Philadelphia.

Even with all the potential benefits of hydroponics, it has yet to become a competitor with traditional farming in the open market.  There are many reasons for this, one reason is that the cost of lighting in an indoor hydroponic system will always cost more than traditional farming, which gets its light for free from the sun.  (Luckily the cost of lighting is dropping all the time with advancements in florescent bulbs and LED technology.) Another reason is that there is a lot of politics around farming that doesn’t favor the development of hydroponics.

Despite all the this, hydroponics is still holds a lot of potential to revolutionize agriculture.  It is also a great way to learn about plant science.  I’m particularly interested in using hydroponics to develop a low cost platform for amateur science experiments.   The hope is that by empowering people with the right tools , the next breakthrough in agriculture might come from a high-school student’s science fair project!

The hydroponic system that I am building at Hive76 is very much in the early stages. In the meantime, I wanted to post a video on a previous hydroponic system that I built in my basement 2 years ago.   It works by flooding the roots of the plants with water supplied by a reservoir below.

Enjoy and stay tuned for updates!

Make Things Awesome(ly Scented)

I’ve been wanting to teach a class on how to make DIY/handmade personal care products for a while (a long while) now. Now, finally, it is happening! On Sunday, December 2nd, from 12-2:30pm, come learn how to craft your own personal care/beauty products from all natural ingredients! Together we will create a variety of body care products– such as aluminum-free deodorant, fabric softener, lip balms, and hand salves– using simple, inexpensive recipes composed of non-toxic materials like cornstarch, olive and coconut oils, beeswax, dried herbs, honey, and essential oils. We will also learn how benign, common household ingredients like baking soda, vinegar, salt, lemon, and hydrogen peroxide can be used to effectively clean around the home. Everyone will leave the class with their own handmade samples of lip balm, deodorant, fabric softener/scented sachet, and hand salve. Sounds like fun, doesn’t it?  I’m super excited to share the processes, recipes, and resources I’ve come across/developed/tweaked over the past couple of years of making my own personal care and cleaning products. Not only is it a fun way to spend an afternoon, but it feels empowering to have control and awareness of what goes on your body. I’ll be showing you just a few more ways that you can avoid consuming—and embrace making—in other aspects of your life!

Added bonus: these easy-to-make products can be re-created on your own to be used as gifts for the upcoming holiday season!!

All Natural Handmade Personal Care Products Class

Sunday, December 2, 2012, 12:00PM – 2:30PM

Hive76, 915 Spring Garden St, Philadelphia, PA 19123

$25 (includes all materials…but feel free to bring your own essential oil if you have a specific signature scent!)


Experiments in Garden Hose Hydraulics

I recently decided to make a proof-of-concept for a simple hydraulics kit. Ultimately you would be able to take this kit, get some standard PVC pipe from the local hardware store, and very quickly build your own simple hydraulic devices. Use it to learn about the principles of hydraulics while staying cool on a hot summer day, or use it to power your homemade tools like simple presses, lifts, or even an articulated digging arm.

Double-acting PVC hydraulic cylinder and control valve

The pressure in your typical garden hose is nominally around 40 psi or so, so my first hydraulic cylinder should be able to develop about 125 pounds of force if it had really good seals. This is a proof of concept so I didn’t bother with o-rings or anything, so it leaks like crazy and thus is unable to develop quite those kinds of pressures, although it is quite strong. Moving from a 2″ to a 3″ hydraulic cylinder would bring this up to about 282 pounds of force, not too shabby for garden hose power!

The hydraulic cylinder is made of standard PVC pipe (2″ for the cylinder and 1.5″ for the ram), although I had to use my lathe to turn down a 1.5″ pipe cap to fit inside the outer cylinder. The control valve is made of 1/2″ CPVC fittings and tubing, with the exception of the spool which is a length of 1/2″ solid PVC rod. I had to turn down the spool on my lathe to the appropriate profile and also had to drill out the valve to fit it. The fit is fairly poor but it shows that the concept definitely works. Eventually I am hoping to be able to have all the custom parts injection molded to get the unit cost down cheap enough that it would make a good toy for DIY doodlers and budding engineers everywhere.

Microbial Cellulose — 2 A2 Sheets Worth

44x18 cellulose sheet drying on clothesline

Back in mid September, we made a batch of Bacterial Cellulose in two 44″ x 18″ tray bioreactors, using Adam Korshid’s “blanco cellulose” medium (sugar, yeast and apple-cider vinegar in ratios carefully measured by eye and tongue).  About two weeks later, one of the cultures had essentially failed, but the other had blossomed with a vengeance, coughing up a giant, off-while pellicle that was about 3/8 inches thick and probably weighing a good 10 pounds.  For what it’s worth, it was also quite a smelly beast.  In fact, the smell largely motivated the timing of the harvest (kind of a “get-that-friggin-thing-outta-here” situation).  One unexpected benefit of the stench was that I was able to identify butyric acid as the main offender — so the absence tea in the culture seems to result in increased butyric acid production. Possibly a consequence of the low nitrogen content of the “blanco” medium?  It might be interesting to research the topic …

At any rate, the 44×18 sheet was ultimately dried and delivered to Ann Saintpeter as promised.  We’ll see what she prints on it, if anything.  While the sheet was drying, I discovered that you could kill the smell by dusting it with baking soda.  It also turns out I was late to that particular party — apparently baking soda is renown as an odor killer precisely because it forms salts with organic acids that tend to be some of the main components of many unpleasant odors.

The sheet ultimately dried to look very much like a giant, soft tortilla, complete with a dusty surface (courtesy of the baking soda).  It also ended up with some mild scorch marks, since I was trying to dry it in a hotel room, using the courtesy hair-dryer and iron.  If nothing else, the scorch marks helped with the tortilla-like appearance.

I’m currently embarking on a little experiment to study factors influencing cellulose production, including density of the substrate (i.e. how much sugar to hit the production “sweet spot”, so to speak) and substrate type (supposedly glycerin is the ultimate feed-stock).  If there are any results worth publishing, we will do so — possibly with hardcopies on microbial cellulose paper.

Cellulose Some, and You Win Some

I have a new obsession — microbial cellulose.  I have been meaning to experiment with this stuff ever since I read Fermented Frocks, the New Couture.  Recently, my sister’s room-mate was discarding a kombucha culture, long past its prime, and I knew I had to have it — despite the fact that was about the closest thing to two gallons of pure biohazard that I have ever laid eyes on.  I peeled a few layers from the decrepit SCOBY that was floating in the middle of the rancid kombucha, and dried them into tough, leathery, translucent “paper” (see the photo with the “paper” covering a CD for perspective). After that, I was hooked — smell be damned — and after some research, I was really hooked.

Microbial "paper" formed by peeling a layer from a kombucha "pellicle" (a.k.a. SCOBY)

Continue reading “Cellulose Some, and You Win Some”