“Hey let’s take the boat out.”
“Hold on, I wanna build a hydrophone first.”
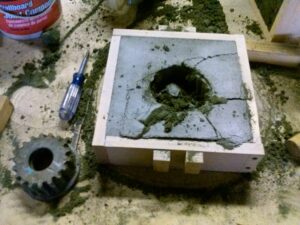
All three major construction methods represented: tape, glue, zip ties.
And so, using the parts left over from the day’s Piezo Transducer Class, some wire, a spraypaint cap, red solo cup, and two sticks, the Hive76 Aquaphone was born. With a battery powered amplifer and some groovy headphones, we had ourselves a mobile underwater listening apparatus. Globs and globs of hot glue waterproofed all connections. Continue reading “A Quick DIY Hydrophone”
Such and Such vs. Uberclocker Advance (credit: Charles Guan)
This past weekend I had the great pleasure of competing at NERC‘s Motorama Robot Conflict with my fighting robot Such and Such – built 100% at Hive76.
Though it might have looked a little boring, that was the most exciting match of the competition for me. After 2 years of on-and-off work, Such and Such, the most ambitious robot I’ll ever build, worked like a charm.
The Creator’s Project released a new video, and our sugar printing, gelation, and blood pumping was featured in it! Trackback is to 3Ders.org The project goal is to unify artists and technologists and this video is focused on 3D Printing:
And I just got done with a talk at ScienceOnTap Philly! It was a truly excellent night! Special thanks to the Organizers and also the Hivers who came out or emailed in their support! You peeps are the best.
Here are some pics via the Twittersphere. Thanks to the photographers for posting!
This year I wanted to do something a little different for Christmas gifts. Instead of just getting people electronics or video games or clothes, I wanted to give something that encouraged creativity and making. A lot of people never even think to try to make things on their own, so maybe a little hobby-style gift will give them a taste and spark an interest.
Texas Instruments MSP430 LaunchPad.
To that end, I did two things. First, I bought ten MSP430 LaunchPads. These things are really inexpensive, so they make great stocking-stuffers. If you don’t know what the MSP430 is already (really, we talk about it constantly, where have you been), it’s a 16-bit microcontroller with really low-power consumption needs. They run on 1.8 to 3.6v power supplies at up to 16MHz, making them quite a powerful little beast for only $4.30, which includes the chip programmer. If you were to buy the chips alone, they cost about $0.50 each, with a few different serial communication protocols built in, and requiring only a small selection of external parts (2 resistors and 2 caps if you want to do it right, 1 resistor if you’re living dangerously, and face it, at $0.50, you can afford to live dangerously). It’s something of a long-term project plan of mine to buy 100 of these and try to build a small, physical neural network computer.
A lot of people have shied away from the MSP430 because the Code Composer Studio software–based on the professional-grade Eclipse development environment–is very difficult to use in comparison to the Processing-based software typically used to program Arduinos. But luckily, someone has taken the Arduino cue and created Energia, a Processing-based editor for use with TI’s LaunchPad line of MCUs! If you’re experienced with Arduino, using Energia is a snap, and if you’re not experienced at all, it’s really not that big of a learning curve.
Making the putty is really easy. I pooled all 6 eggs of putty together in a non-stick pan. On very low heat, I warmed up the putty until it was just too hot to handle with my bare hands. If it starts to become the consistency of chewing gum and sticks to the pan, don’t worry, it will unstick when it cools down. Don’t heat it further than that though, it will start to smoke and burn. Wearing rubber gloves to give me just enough insulation from the heat and to keep my hands from getting stained black, it’s just a matter of working a large, heaping tablespoon-full of the black powder into the putty. You will need to work the putty like taffy, stretching it and folding it to blend the powder evenly into it. Once the powder is sufficiently kneaded in to the putty, it will not stain anything, so keep testing it on the back of your rubber glove to see if it leaves any marks. I then cut the putty into 6 equal chunks and shoved them back in their eggs. It took 10 minutes total. I thought about taking some photos of the process to show it off, but really, it could not be simpler.
I’m hoping these gifts will be completely unexpected and will inspire people to try something they never would have considered on their own. The MSP430s are just a really easy, cheap, fun way to get into programming, and the magnetic Silly Putty is a great example of something you can’t buy as a product that is also extremely easy to make.
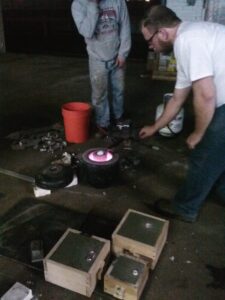
Lately, a few members have been discussing the use of 3D printed parts in use with metal casting techniques to create some stronger, lighter and more durable parts. As all good hackerspace conversations do, we immediately decided to go with the most painful and difficult solution: Metal Casting. Luckily for us the very next day, we got an e-mail that a local group, Philadelphia Sculpture Gym, that they intended on hosting an aluminium greensand casting class. A perfect opportunity to learn some metal casting techniques, even if not totally applicable to what we wanted to ultimately end up casting. Andrew S., and myself both signed up along with a few friends of Hive76.
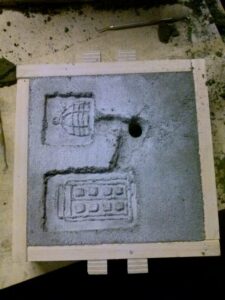
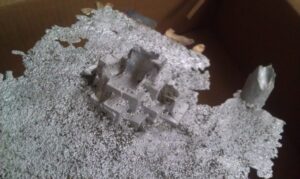
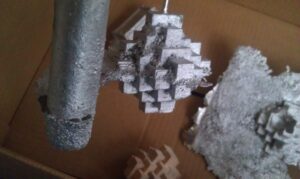
About 30 minutes into making our own greensand molds, we realized that this was going to be a difficult process, and immediately destroyed several hours of work trying to get a good crisp mold for our first pour.
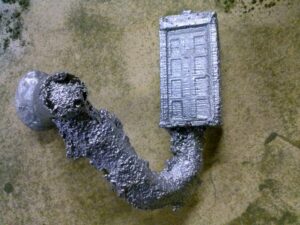
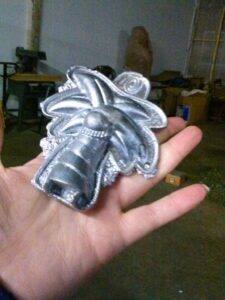
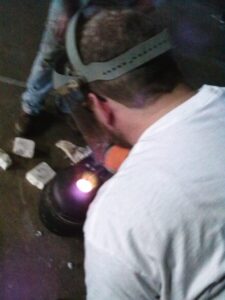
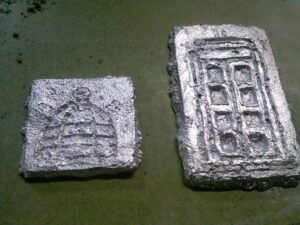
Several hours into our class, we managed to finally get a good solid mold of a 3D printed TARDIS. We hopped in line and got a pretty good looking cast. Andrew also attempted the TARDIS with some success. He also managed to get some good casts of a wooden puzzle, including one that blew out. However, due to our earlier troubles, we decided to hedge our bets and get one more good pour out of the class before we would start wrapping up. While waiting to pour ours, I was being shown how to work the furnace by Gus, and ended up melting down plenty of scrap and helping others make their pours which was a lot of fun to be working with. The furnace was operating at about 1300 Celsius, and moving around molten metal at that temperature can be quite a thrill. We plan on working with Gus and Darla at Philadelphia Sculpture Gym on some other types of casting techniques, especially as they apply to our 3D printing. We look forward to working with them in the future, and hope you all consider taking their next Greensand class in January.
One of my first projects here at Hive76 was the Burning Zombie Dummy. A friend of mine had called me, asking me if I knew how to set people on fire safely, and that led into a very stern discussion about what he was trying to do and that I would take over so that noone would get hurt. So I became the Special Effects Design Engineer for Exile: The Family You Choose, and it was one of the best times of my life. I got to do some pretty awesome things (including making an impromptu harness for doing a shotgun-to-the-chest effect), met a lot of really great people, and learned a lot about a hobby that would ignite my passion in a way I hadn’t felt in a long time. Seeing our end result, this thing that we made together, from start to finish, without any adults (of course, we’re all adults, but you never really feel like it) helped to further cement my belief that anyone is capable of doing anything. The hacker spirit is strong in the indie film world. Continue reading “Zombie Web Series Kickstarter Time!”
Many folks surely remember the days of fighting robots on TV: Battlebots, Robot Wars, Robotica, etc. And while its televised days are behind it, the sport is kept alive by groups of builders and competitors across the country. The Northeast Robotics Club (NERC) is just such a group, and one that I have been a member of since I first saw robots destroy and get destroyed on TV.
In the years since, I’ve traveled up and down the East Coast competing with robots of my own. But this past weekend, our own city of Philadelphia hosted NERC’s annual Franklin Cup, held in conjunction with the Franklin Institute. For this event I decided to continue the lineage of a long-standing family of NERC bots: ALF!
Now, this is the first robot I’ve built since I’ve moved to Philadelphia. My center-city apartment is about the size of a large phone booth and lacking any machine tools, so it’s obviously not a good workspace. The Hive, on the other hand, with its storage space, large work areas, and 24hr availability of tools and resources, was the perfect place to build. It may sound like a shameless plug, but the story of ALF would be incomplete without it.
I recently decided to make a proof-of-concept for a simple hydraulics kit. Ultimately you would be able to take this kit, get some standard PVC pipe from the local hardware store, and very quickly build your own simple hydraulic devices. Use it to learn about the principles of hydraulics while staying cool on a hot summer day, or use it to power your homemade tools like simple presses, lifts, or even an articulated digging arm.
Double-acting PVC hydraulic cylinder and control valve
The pressure in your typical garden hose is nominally around 40 psi or so, so my first hydraulic cylinder should be able to develop about 125 pounds of force if it had really good seals. This is a proof of concept so I didn’t bother with o-rings or anything, so it leaks like crazy and thus is unable to develop quite those kinds of pressures, although it is quite strong. Moving from a 2″ to a 3″ hydraulic cylinder would bring this up to about 282 pounds of force, not too shabby for garden hose power!
The hydraulic cylinder is made of standard PVC pipe (2″ for the cylinder and 1.5″ for the ram), although I had to use my lathe to turn down a 1.5″ pipe cap to fit inside the outer cylinder. The control valve is made of 1/2″ CPVC fittings and tubing, with the exception of the spool which is a length of 1/2″ solid PVC rod. I had to turn down the spool on my lathe to the appropriate profile and also had to drill out the valve to fit it. The fit is fairly poor but it shows that the concept definitely works. Eventually I am hoping to be able to have all the custom parts injection molded to get the unit cost down cheap enough that it would make a good toy for DIY doodlers and budding engineers everywhere.
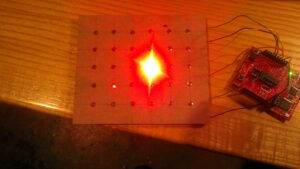
This 5×6 LED tile is a key component in a secret project that I’m developing (in secret) with some other folks (whose names shall remain a secret).
Why be so public about something so secret? Because this tile uses a layout technique that lets you build charlie-plexed LED arrays quickly and cheaply — and that’s something worth sharing.
You need to flip the tile over in order to see what’s special about it. Here’s a quick list of features that make the assembly what it is:
The back of the tile has six “column” conductors and six “row” conductors.
These column and row conductors are connected along the diagonal of the row/column array. At all other points in the matrix, the row and column conductors are isolated via a layer of masking tape.
LEDs above the diagonal have their cathode connected to the conductive row immediately above the LED. LEDs on or below the diagonal have their cathode connected to the conductive row immediately below the LED.
All LEDs have their anode connected to the column that is to their immediate left.
One of our core members, Jordan Miller, has just published a scientific paper using RepRap 3D printing technology to engineer living tissues for regenerative medicine. I’ll give you a rundown of the science and a step-by-step guide of how Jordan got to this great spot in his career. Jordan is quick to point out that this is work that would not have been possible 5 years ago, or without the help of RepRap, Hive76, and this wonderful city of Philadelphia.
There are other labs around the world that are attempting what Jordan and the rest of the team at UPenn and MIT have been working towards. The end goal of regenerative medicine research is engineered tissues and replacement organs for treatment of human disease. As Science news says,
Imagine a world where if your heart or kidneys failed, you wouldn’t have to endure an agonizing, possibly futile wait for a donor whose organ your body might reject. Instead, a doctor would simply take cells from your own body and use them to “grow” you a new organ.
Other lines of research are attempting to 3D print directly with living cells and gel. These so-called “bioprinting” approaches involve loading cells and gel in syringes to be used as feedstock to create a structure from scratch. The problem is that healthy liver cells, for example, usually die of starvation (lack of nutrients) and suffocation (lack of oxygen) while enduring the slow 3D printing process.
Jordan’s 3D printed vasculature approach was inspired by whole organ vascular casts like this one.
Enter Jordan and his innovation: since vasculature provides the lifeblood to resident cells, why not focus on the vasculature first?
Jordan and the rest of the research team at UPenn and MIT have developed a new way to create vasculature for living tissues. This 4 step process involves: 1) 3D printing a network of sugar filaments, 2) surrounding it with living cells in a gel, 3) dissolving away the sugar to leave behind a vascular network for 4) the delivery of nutrients and oxygen. He accomplished this with a custom built 3D printer, extruder and control software.
Here’s a step-by-step of Jordan’s many year process:
Get a crazy idea to link sugar and vasculature when comparing the interior of a 3D print to a capillary network.
You can read the Penn press release about this awesome science, an overview from Science News, or the full paper. A more detailed post about the hardware used in this project will follow and soon you’ll be able to make your own sugar extruder. (It prints chocolate too!)


 ZOMG GUYZ!

 This 5×6 LED tile is a key component in a secret project that I’m developing (in secret) with some other folks (whose names shall remain a secret).
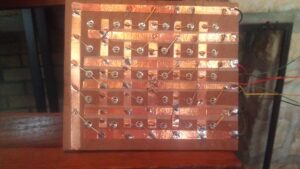 You need to flip the tile over in order to see what’s special about it. Here’s a quick list of features that make the assembly what it is:
